1. 概述
设备的休眠是功耗分析中的重要篇章,有些问题经常会涉及到系统无法休眠,经常被唤醒等情况。在这里将从代码角度来分析下Android系统休眠和唤醒的机制,而本篇将着重阐述休眠机制。
Android系统的电源管理子系统是已Linux的电源管理系统为基础,针对现实问题又进行了改造,而这里的现实问题来自于PC和移动设备的差异,其核心在于什么时候休眠,什么时候唤醒。在PC系统中,什么时候让系统进入休眠(通常是STR、Standby、Hibernate等suspend操作)这个问题很容易理解:答案就是由用户在其不再使用时触发。
然而移动设备的特性决定了用户可能随时随地会使用设备,那么休眠的时机就变得非常不明确了。于是Android上提出了Opportunistic suspend这个概念,通俗的讲就是逮住机会就赶紧休眠一会儿直到下次被唤醒,而这个机会就是系统没有任务需要处理的时候。由此就衍生除了autosleep机制和wake source的概念。Android的休眠是一种自动休眠,当系统中不存在唤醒源时就进行系统整体休眠。相比于Linux内核中复杂的单独模块休眠管理(Dynamic PM),Android的此套设计方式简单粗暴,但是实实在在的解决了移动设备上面临的燃眉之急。
或许等读完本篇文章之后能让你产生更好的解决方案并有志去改一下Android PM子系统的代码,那我将不甚荣幸。在本篇末,我也会附上我个人的几点想法,希望有志同道合之友一起研讨。
2. Frameworks层
系统休眠又用户主动发起的关系并不是很大,在用户和应用的行为中,主动通过power键发起灭屏或者是调用PowerManager的goToSleep接口来进行系统休眠是较常用的操作,其他也没有更多的手段。而系统休眠大多是系统主动检测并发起休眠流程,所以本篇中就不涉及上层的流程了,直接从Frameworks开始。
Frameworks层这部分的设计思想比较简单,主要是:电源管理通过监测display的状态,当灭屏时则发起休眠的流程,调用native层的方法继续往下走。这里就很好的体现了前文提到的Opportunistic suspend概念,伺机休眠这里的“机”的第一层就是以灭屏作为契机的。果然是简单粗暴的判断,但是非常实用,从用户角度来将,灭屏的现象确实是让设备休眠的理想触发。当然,在灭屏时需要后台处理任务的情况也是存在,所以在后面流程中会继续判断是否真正能够进入休眠。接下来从代码角度解读下frameworks层的实现。
流程就先从灭屏开始看,系统中除了PowerManagerService外还有个叫做DisplayManagerService的核心服务来管理display相关的电源状态,它也是在SystemServer中启动起来的。在PowerManagerService中systemReady方法中会去初始化DisplayManagerService
    // Initialize display power management.
    mDisplayManagerInternal.initPowerManagement(
            mDisplayPowerCallbacks, mHandler, sensorManager);
DisplayManagerService中的initPowerManagement相关部分如下:
    @Override
    public void initPowerManagement(final DisplayPowerCallbacks callbacks, Handler handler,
            SensorManager sensorManager) {
        synchronized (mSyncRoot) {
            DisplayBlanker blanker = new DisplayBlanker() {
                @Override
                public void requestDisplayState(int state, int brightness) {
                    // The order of operations is important for legacy reasons.
                    if (state == Display.STATE_OFF) {
                        requestGlobalDisplayStateInternal(state, brightness);
                    }
                        callbacks.onDisplayStateChange(state);
                        if (state != Display.STATE_OFF) {
                        requestGlobalDisplayStateInternal(state, brightness);
                    }
                }
            };
            mDisplayPowerController = new DisplayPowerController(
                    mContext, callbacks, handler, sensorManager, blanker);
        }
    }
实现了DisplayBlanker接口,并重写了其requestDisplayState方法,在此方法中又调用DisplayPowerCallbacks接口的onDisplayStateChange方法来进行display发生变化之后的操作。这一段为整个frameworks流程中的核心部分也是流程的中间部分,接下来补上它的头和尾。
首先是display改变的消息传递,也就是代码流程中如何会调用到DisplayBlanker接口的requestDisplayState,来看图就可以了:

首先是在DisplayPowerController中收到MSG_UPDATE_POWER_STATE消息,随后经过一系列的回调了DisplayBlanker接口的requestDisplayState,其中每个细节不是这里的重点就不展开一一分析了。
然后是尾,DisplayPowerCallbacks接口的onDisplayStateChange方法在PowerManagerService中
    public void onDisplayStateChange(int state) {
        // This method is only needed to support legacy display blanking behavior
        // where the display's power state is coupled to suspend or to the power HAL.
        // The order of operations matters here.
        synchronized (mLock) {
            if (mDisplayState != state) {// display的状态发生改变
                mDisplayState = state;
                if (state == Display.STATE_OFF) {// 灭屏
                    if (!mDecoupleHalInteractiveModeFromDisplayConfig) {// 默认false
                        setHalInteractiveModeLocked(false);// 关闭交互模式
                    }
                    if (!mDecoupleHalAutoSuspendModeFromDisplayConfig) {// 默认false
                        setHalAutoSuspendModeLocked(true);// 开启autosleep模式
                    }
                } else {// 亮屏
                    if (!mDecoupleHalAutoSuspendModeFromDisplayConfig) {
                        setHalAutoSuspendModeLocked(false);// 关闭autosleep模式
                    }
                    if (!mDecoupleHalInteractiveModeFromDisplayConfig) {
                        setHalInteractiveModeLocked(true);// 开启交互模式
                    }
                }
            }
        }
    }
这一段中有一个非常重要的核心:前面提到了将灭屏作为休眠发起的条件,也就是说将灭屏和休眠作为了耦合的关系,而这里提供了解耦的操作,可以在代码配置中来选择是否要解耦。判断的依据就是mDecoupleHalAutoSuspendModeFromDisplayConfig这个变量,它的默认值定义在frameworks/base/core/res/res/values/config.xml中:
    <!-- Power Management: Specifies whether to decouple the auto-suspend state of the
         device from the display on/off state.

         When false, autosuspend_disable() will be called before the display is turned on
         and autosuspend_enable() will be called after the display is turned off.
         This mode provides best compatibility for devices using legacy power management
         features such as early suspend / late resume.

         When true, autosuspend_display() and autosuspend_enable() will be called
         independently of whether the display is being turned on or off.  This mode
         enables the power manager to suspend the application processor while the
         display is on.

         This resource should be set to "true" when a doze component has been specified
         to maximize power savings but not all devices support it.

         Refer to autosuspend.h for details.
    -->
    <bool name="config_powerDecoupleAutoSuspendModeFromDisplay">false</bool>
解读:默认情况下将suspend流程和display的状态耦合在一起,默认为false(不解耦),在默认情况下,在屏幕off之后调用启用autosuspend,在屏幕on之前关闭autosuspend_enable。而如果解耦,那么suspend的流程将被独立调用而不管屏幕状态,在此模式下就算是屏幕on也允许系统休眠。
这一段代码中还包括了另外一个操作,setHalInteractiveModeLocked来设置系统可交互模式,由mDecoupleHalInteractiveModeFromDisplayConfig这个变量来控制和display的耦合关系。同样附上这个默认值的定义:
    <!-- Power Management: Specifies whether to decouple the interactive state of the
         device from the display on/off state.

         When false, setInteractive(..., true) will be called before the display is turned on
         and setInteractive(..., false) will be called after the display is turned off.
         This mode provides best compatibility for devices that expect the interactive
         state to be tied to the display state.

         When true, setInteractive(...) will be called independently of whether the display
         is being turned on or off.  This mode enables the power manager to reduce
         clocks and disable the touch controller while the display is on.

         This resource should be set to "true" when a doze component has been specified
         to maximize power savings but not all devices support it.

         Refer to power.h for details.
    -->
    <bool name="config_powerDecoupleInteractiveModeFromDisplay">false</bool>
解读:这里描述了系统的可交互模式和display的耦合关系。当设置为false时,两者为耦合的关系,在display状态on之前setInteractive(…, true)设置为可交互;在display状态为off之后设置为不可交互。而如果为解耦状态,那么交互模式也将可以被独立设置不论display的状态如何。
我们还是来继续看auto sleep的流程,当灭屏时,调用PowerManagerService的setHalAutoSuspendModeLocked(true)
    private void setHalAutoSuspendModeLocked(boolean enable) {
        if (enable != mHalAutoSuspendModeEnabled) {
            if (DEBUG) {
                Slog.d(TAG, "Setting HAL auto-suspend mode to " + enable);
            }
            mHalAutoSuspendModeEnabled = enable;
            Trace.traceBegin(Trace.TRACE_TAG_POWER, "setHalAutoSuspend(" + enable + ")");
            try {
                nativeSetAutoSuspend(enable);
            } finally {
                Trace.traceEnd(Trace.TRACE_TAG_POWER);
            }
        }
    }
这里只是做了些判断和加调试代码,然后将流程通过nativeSetAutoSuspend带入到了native库中。
3. Native层
根据JNI的机制可以找到代码进入到了com_android_server_power_PowerManagerService.cpp中的nativeSetAutoSuspend中:
    static void nativeSetAutoSuspend(JNIEnv* /* env */, jclass /* clazz */, jboolean enable) {
        if (enable) {
            ALOGD_IF_SLOW(100, "Excessive delay in autosuspend_enable() while turning screen off");
            autosuspend_enable();
        } else {
            ALOGD_IF_SLOW(100, "Excessive delay in autosuspend_disable() while turning screen on");
            autosuspend_disable();
        }
    }
当灭屏时(默认情况下)调用autosuspend_enable(),然后进一步的实现在libsuspend这个库中,源代码位于system/core/libsuspend目录下。
3.1 休眠机制初始化
在阅读了代码之后发现其中有一些autosuspend机制是在开机时进行的初始化,要更好的理解autosuspend的完整含义,本节中先介绍开机初始化时的代码流程和其中包含的一些概念和意义。
在代码流程中添加了一些关键点的log,我们跟着log来追踪下代码走向,开机时打印出的log如下:
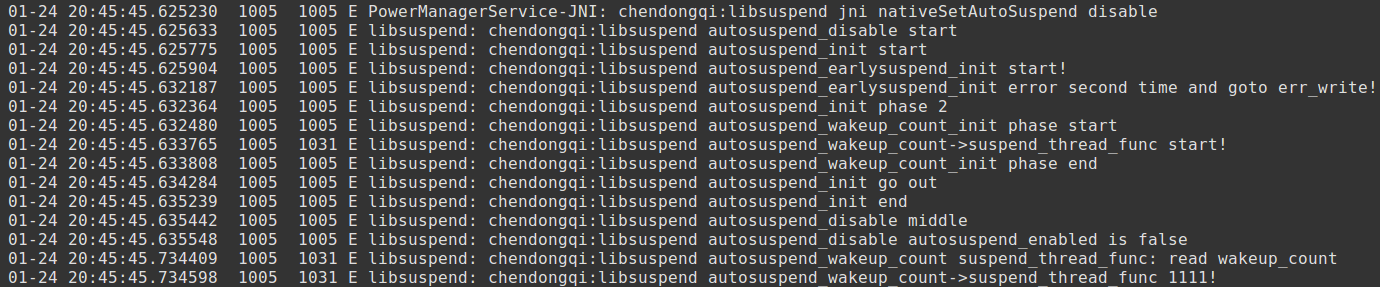 1、首先是调用到com_android_server_power_PowerManagerService.cpp的nativeSetAutoSuspend,因为在开机过程中不允许系统休眠,所以会进一步调用autosuspend_disable()来禁止系统休眠。
    static void nativeSetAutoSuspend(JNIEnv* /* env */, jclass /* clazz */, jboolean enable) {
        if (enable) {
            ALOGE("chendongqi-libsuspend: nativeSetAutoSuspend go into autosuspend_enable()");
            ALOGD_IF_SLOW(100, "Excessive delay in autosuspend_enable() while turning screen off");
            autosuspend_enable();
        } else {
            ALOGE("chendongqi-libsuspend: nativeSetAutoSuspend go into autosuspend_disable()");
            ALOGD_IF_SLOW(100, "Excessive delay in autosuspend_disable() while turning screen on");
            autosuspend_disable();
        }
    }
2、然后调用到autosuspend.c中的autosuspend_disable
    int autosuspend_disable(void)
    {
        ALOGE("chendongqi: libsuspend autosuspend-->autosuspend_disable start\n");
        int ret;

        ret = autosuspend_init();
        if (ret) {
            return ret;
        }

        ALOGV("autosuspend_disable\n");
        ALOGE("chendongqi: libsuspend autosuspend-->autosuspend_disable middle\n");
        if (!autosuspend_enabled) {
            ALOGE("chendongqi: libsuspend autosuspend-->autosuspend_disable autosuspend_enabled is false\n");
            return 0;
        }

        ret = autosuspend_ops->disable();
        if (ret) {
            return ret;
        }

        // add for wakeup_source debugger
        if (autosuspend_debugger_ops) {
            autosuspend_debugger_ops->disable();
        }

        autosuspend_enabled = false;
        ALOGE("chendongqi: libsuspend autosuspend-->autosuspend_disable end\n");
        return 0;
    }
输出start之后调用了autosuspend_init()方法进行初始化
    static int autosuspend_init(void)
    {
        ALOGE("chendongqi: libsuspend autosuspend-->autosuspend_init start\n");
        if (autosuspend_inited) {
            return 0;
        }

        autosuspend_ops = autosuspend_earlysuspend_init();
        if (autosuspend_ops) {
            goto out;
        }
开机时autosuspend_inited不为true,继续向下,调用到了autosuspend_earlysuspend.c的autosuspend_earlysuspend_init方法。
    sPowerStatefd = TEMP_FAILURE_RETRY(open(EARLYSUSPEND_SYS_POWER_STATE, O_RDWR));

    if (sPowerStatefd < 0) {
        strerror_r(errno, buf, sizeof(buf));
        ALOGW("Error opening %s: %s\n", EARLYSUSPEND_SYS_POWER_STATE, buf);
        ALOGE("chendongqi: libsuspend autosuspend_earlysuspend_init error first time!\n");
        return NULL;
    }

    ret = TEMP_FAILURE_RETRY(write(sPowerStatefd, "on", 2));
    if (ret < 0) {
        strerror_r(errno, buf, sizeof(buf));
        ALOGW("Error writing 'on' to %s: %s\n", EARLYSUSPEND_SYS_POWER_STATE, buf);
        ALOGE("chendongqi: libsuspend autosuspend_earlysuspend_init error second time and goto err_write!\n");
        goto err_write;
    }
先是打开设备节点/sys/power/state成功了,然后尝试写入on,失败,goto错误处理,然后关闭设备节点,返回NULL。
    err_write:
        close(sPowerStatefd);
        return NULL;
然后再回到autosuspend_init的流程中
    ALOGE("chendongqi: libsuspend autosuspend-->autosuspend_init phase 2\n");
    autosuspend_ops = autosuspend_wakeup_count_init();
    if (autosuspend_ops) {
        goto out;
    }
进入到autosuspend_wakeup_count.c中的autosuspend_wakeup_count_init()方法来给autosuspend_ops这个指针赋值。在autosuspend_wakeup_count_init中做了以下几件事:
打开/sys/power/state设备节点:
    state_fd = TEMP_FAILURE_RETRY(open(SYS_POWER_STATE, O_RDWR));
    if (state_fd < 0) {
        ALOGE("chendongqi: libsuspend autosuspend_wakeup_count-->autosuspend_wakeup_count_init phase 0\n");
        strerror_r(errno, buf, sizeof(buf));
        ALOGE("Error opening %s: %s\n", SYS_POWER_STATE, buf);
        goto err_open_state;
    }
打开/sys/power/state设备节点:
    wakeup_count_fd = TEMP_FAILURE_RETRY(open(SYS_POWER_WAKEUP_COUNT, O_RDWR));
    if (wakeup_count_fd < 0) {
        strerror_r(errno, buf, sizeof(buf));
        ALOGE("chendongqi: libsuspend autosuspend_wakeup_count-->autosuspend_wakeup_count_init phase 1\n");
        ALOGE("Error opening %s: %s\n", SYS_POWER_WAKEUP_COUNT, buf);
        goto err_open_wakeup_count;
    }
做信号量的初始化(函数原型定义在bionic/libc/include/semaphore.h),后面用来做线程同步:
    ret = sem_init(&suspend_lockout, 0, 0);
    if (ret < 0) {
        strerror_r(errno, buf, sizeof(buf));
        ALOGE("chendongqi: libsuspend autosuspend_wakeup_count-->autosuspend_wakeup_count_init phase 2\n");
        ALOGE("Error creating semaphore: %s\n", buf);
        goto err_sem_init;
    }
创建一个线程来跑suspend_thread_func函数,这个函数很重要,稍后会具体介绍:
    ret = pthread_create(&suspend_thread, NULL, suspend_thread_func, NULL);
    if (ret) {
        strerror_r(ret, buf, sizeof(buf));
        ALOGE("Error creating thread: %s\n", buf);
        goto err_pthread_create;
    }
最后返回autosuspend_wakeup_count_ops这个结构体的地址,这个结构体的定义为
struct autosuspend_ops autosuspend_wakeup_count_ops = {
        .enable = autosuspend_wakeup_count_enable,
        .disable = autosuspend_wakeup_count_disable,
};
然后流程再回到autosuspend.c中的autosuspend_init方法,因为得到了指针的赋值,所以流程跳转到out,返回0。流程再退回到autosuspend_disable中。
    ALOGE("chendongqi: libsuspend autosuspend-->autosuspend_disable middle\n");

    if (!autosuspend_enabled) {
        ALOGE("chendongqi: libsuspend autosuspend-->autosuspend_disable autosuspend_enabled is false\n");
        return 0;
    }

    ret = autosuspend_ops->disable();
    if (ret) {
        return ret;
    }
因为是开机,autosuspend_enabled变量为false,所以走进了这个if判断,输出log,返回0结束开机时的这个流程,主要就是初始化一些变量和设备节点。
再回头来看下suspend_thread_func方法的流程,进去之后就是一个死循环,在休眠100ms之后去读取/sys/power/wakeup_count,然后从log看这后面的流程就都一直没走了,卡在读取的函数中,这个机制需要就这里解释下。目前android休眠的机制已经不再使用earlysuspend了,而是用wakeup_count来代替,wakeup_count的机制是为了保证休眠和唤醒的同步。当wakeup_count这个节点中有值时,表示还有唤醒源阻止了系统休眠,所以suspend的流程就不会走下去。
    while (1) {
        ALOGE("chendongqi: libsuspend autosuspend_wakeup_count-->suspend_thread_func start!\n");
        usleep(100000);
        ALOGV("%s: read wakeup_count\n", __func__);
        ALOGE("chendongqi: libsuspend autosuspend_wakeup_count %s: read wakeup_count\n", __func__);
        lseek(wakeup_count_fd, 0, SEEK_SET);
        ALOGE("chendongqi: libsuspend autosuspend_wakeup_count-->suspend_thread_func phase 1!\n");
        wakeup_count_len = TEMP_FAILURE_RETRY(read(wakeup_count_fd, wakeup_count,
                sizeof(wakeup_count)));
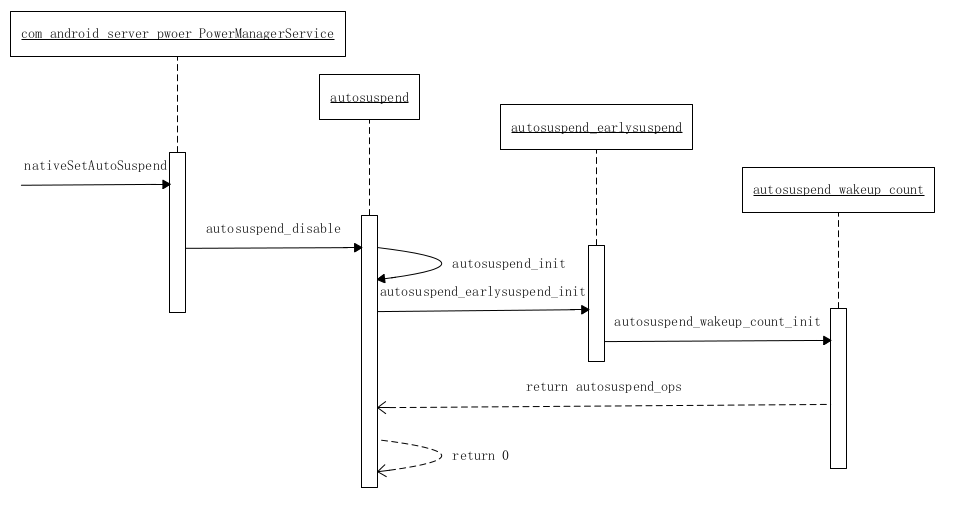
下图总结了开机时autosuspend初始化的流程:
3.2 正常休眠
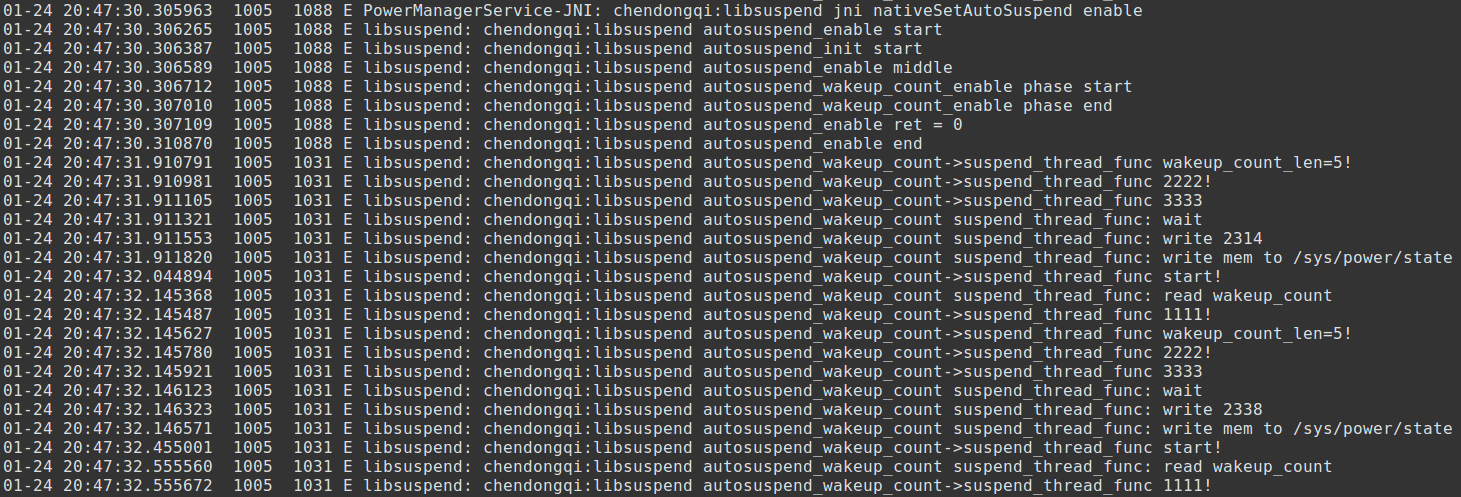
正常休眠时会在com_android_server_power_PowerManagerService调用autosuspend_enable方法,进入到autosuspend.c中。打印出的流程log如下:
首先还是调用autosuspend_init来做初始化
    static int autosuspend_init(void)
    {
        ALOGE("chendongqi: libsuspend autosuspend-->autosuspend_init start\n");
        if (autosuspend_inited) {
            return 0;
        }
因为在开机时已经做过初始化了,autosuspend_inited为true,所以这里直接返回。然后通过ops的指针调用enable函数
ret = autosuspend_ops->enable();
通过开机中的初始化后,ops的指针指向了autosuspend_wakeup_count的结构体,所以这里会调用到autosuspend_wakeup_count的autosuspend_wakeup_count_enable函数。
在autosuspend_wakeup_count_enable函数中只做了一件事,post了一个信号量。
ret = sem_post(&suspend_lockout);
这里简单介绍下信号量的知识点,sem_post为一个信号量操作的函数,suspend_lockout为共享的资源池,sem_post函数为suspend_lockout这个信号量增加值,当有进程阻塞在这个信号量上时,调用sem_post函数会使一个线程不再阻塞,选择机制和进程调度有关。而另一个基本的操作函数是sem_wait,这个函数用来阻塞线程,直到信号量的值大于0,使用后将会减少信号量的值。
继续来顺着流程看,在开机流程中,走到了autosuspend_wakeup_count的suspend_thread_func函数中,然后进入了一个死循环,在读取设备节点时被阻塞了。
    wakeup_count_len = TEMP_FAILURE_RETRY(read(wakeup_count_fd, wakeup_count,
            sizeof(wakeup_count)));
在这里休眠流程中,没有wakeup event需要处理,这里不再阻塞,从log也可以看到,读取设备节点有了返回结果。然后接下来调用了sem_wait函数来拿到信号量资源,用来保证写设备节点时的互斥性。
之后会将前面读到的wakeup_count回写到设备节点sys/power/wakeup_count中去,这个操作是为了判断,从上一次到当前是否有新注册的wakeup event和正在处理的wakeup event。
如果没有的话才会去往/sys/power/state中写入mem,如果有新的wake event需要处理则会继续陷入到read的方法中去。
    ret = TEMP_FAILURE_RETRY(write(wakeup_count_fd, wakeup_count, wakeup_count_len));
    ...
    ret = TEMP_FAILURE_RETRY(write(state_fd, sleep_state, strlen(sleep_state)));
操作完成之后再调用sem_post函数来释放信号量。
4. Kernel
在上面的流程中在休眠时完成了对设备节点/sys/power/state写入mem的操作,在kernel中注册了对这个设备节点操作的函数。代码位于/kernel3.18/kernel/power/main.c中,这个函数里注册了和power相关的节点的处理函数。关于state这个节点,注册了两个函数为state_store和state_show,分别对应写入和读取两个操作的处理函数。
后记
1、关于休眠发起的时机——在亮屏但是无任务时也能发起休眠流程
–如何判断无任务?
—-亮屏状态下一段时间无用户操作&无除display以外的blocker
–休眠行为?
—-设备整体进入suspend,屏幕单独处理
2、各模块单独休眠管理