适用平台
Android Version: 6.0
Platform: MTK6580/MTK6735/MTK6753
1. pSensor代码主要流程介绍
在PowerManager中更新display状态时就会调用到DisplayPowerController的updatePowerState()方法,所以这个方法是电源模块中display更新的入口。本篇的分析就以此开始。
- 在DisplayPowerController中定义SensorManager和pSensor
mSensorManager = sensorManager; ...... mProximitySensor = mSensorManager.getDefaultSensor(Sensor.TYPE_PROXIMITY); - 调用DisplayPowerController的updatePowerState()方法更新display状态,其中有段代码是专门处理pSensor状态的。
android.util.Log.v("chendongqi-power", "useProximitySensor = "+mPowerRequest.useProximitySensor+ ", state="+state+ ", mScreenOffBecauseOfProximity="+mScreenOffBecauseOfProximity+ ", mProximity="+mProximity+ ", mWaitingForNegativeProximity="+mWaitingForNegativeProximity); // Apply the proximity sensor. if (mProximitySensor != null) { if (mPowerRequest.useProximitySensor && state != Display.STATE_OFF) { android.util.Log.v("chendongqi-power", "position 001-mScreenOffBecauseOfProximity="+mScreenOffBecauseOfProximity); setProximitySensorEnabled(true); if (!mScreenOffBecauseOfProximity && mProximity == PROXIMITY_POSITIVE) { android.util.Log.v("chendongqi-power", "position 002"); mScreenOffBecauseOfProximity = true; sendOnProximityPositiveWithWakelock(); } } else if (mWaitingForNegativeProximity && mScreenOffBecauseOfProximity && mProximity == PROXIMITY_POSITIVE && state != Display.STATE_OFF) { android.util.Log.v("chendongqi-power", "position 003"); setProximitySensorEnabled(true); } else { if (mPowerRequest.useProximitySensor) { if (mScreenOffBecauseOfProximity) { android.util.Log.v("chendongqi-power", "position 004"); mProximity = PROXIMITY_UNKNOWN; } android.util.Log.v("chendongqi-power", "position 005"); setProximitySensorEnabled(true); } else { setProximitySensorEnabled(false); } mWaitingForNegativeProximity = false; } if (mScreenOffBecauseOfProximity && mProximity != PROXIMITY_POSITIVE) { android.util.Log.v("chendongqi-power", "position 006"); mScreenOffBecauseOfProximity = false; sendOnProximityNegativeWithWakelock(); } } else { mWaitingForNegativeProximity = false; } if (mScreenOffBecauseOfProximity) { state = Display.STATE_OFF; } - 这段代码很少,但是逻辑比较复杂,主要是在判断不同状态下pSensor应有的行为模式。以上代码在后文中还会详解,在流程上最重要的两个流程包括了处理pSensor靠近事件(以上代码中position 002位置),调用了sendOnProximityPositiveWithWakelock()来处理,这块详细处理在第四章中讲解;另外就是处理pSensor远离事件(以上代码position 006位置),通过调用sendOnProximityNegativeWithWakelock()来处理,同样在后续详解。
2. pSensor工作相关状态分析
要清楚的把握不同状态下这段代码的流程,必须先了解判断语句中用到的几个变量,包括了以下几个变量:DisplayPowerRequest.useProximitySensor、state、mScreenOffBecauseOfProximity、mProximity、mWaitingForNegativeProximity、mProximitySensorEnabled。
2.1 DisplayPowerRequest.useProximitySensor
在PMS中更新电源状态时方法updateDisplayPowerStateLocked中会赋值mDisplayPowerRequest.useProximitySensor = shouldUseProximitySensorLocked();而shouldUseProximitySensorLocked()的内容为
return (mWakeLockSummary & WAKE_LOCK_PROXIMITY_SCREEN_OFF) != 0;
即如果pSensor没有获取电源锁则返回false,否则为true,也就是表明pSensor的可用状态。而pSensor电源锁的控制主要是由通话状态来控制的,在InCallUI模块中的ProximitySensor.java中会根据来电状态来更新pSensor的电源锁状态,而电源锁实际的操作则是在Telecom模块中的ProximitySensorManager.java中的turnOn和tureOff方法来实现。
DisplayPowerRequest.useProximitySensor在不同状态时的值:
来电/去电/通话-true
空闲/挂断-false
通话时-插入有线耳机/连接蓝牙耳机/开外放/开启拨号盘-false
2.2 state
state是指display的状态,一共在Display.java中定义了五个状态:
STATE_UNKNOWN = 0 //未知
STATE_OFF = 1 //屏幕灭
STATE_ON = 2 //屏幕亮
STATE_DOZE = 3 //低电量时屏幕依旧亮着但是无用户交互时
STATE_DOZE_SUSPEND = 4 //比STATE_DOZE更省电的模式,用来实现低电情况下保持屏幕常亮的功能
从判断逻辑来看,state的值只有在OFF状态下pSensor会不工作,这里要注意的是由pSensor导致的灭屏,屏幕状态还是为ON,对后续理解逻辑流程很重要。
2.3 mScreenOffBecauseOfProximity
这个状态表示是否因为pSensor导致灭屏,这个值只有在DisplayPowerController中有两处赋值的地方。
    if (!mScreenOffBecauseOfProximity
            && mProximity == PROXIMITY_POSITIVE) {
        android.util.Log.v("chendongqi-power", "position 002");
        mScreenOffBecauseOfProximity = true;
        sendOnProximityPositiveWithWakelock();
    }
亮屏情况下,当pSensor接近时,且mScreenOffBecauseOfProximity不为true,则将mScreenOffBecauseOfProximity置为true,并进行灭屏。
    if (mScreenOffBecauseOfProximity
            && mProximity != PROXIMITY_POSITIVE) {
        android.util.Log.v("chendongqi-power", "position 006");
        mScreenOffBecauseOfProximity = false;
        sendOnProximityNegativeWithWakelock();
    }
灭屏情况下,当mScreenOffBecauseOfProximity为true时,且pSensor远离,则将mScreenOffBecauseOfProximity置为false,并亮屏。
2.4 mProximity
这个变量标志pSensor的状态,一共有三个状态值:
PROXIMITY_UNKNOWN = -1;
PROXIMITY_NEGATIVE = 0;
PROXIMITY_POSITIVE = 1;
初始化时private int mProximity = PROXIMITY_UNKNOWN
2.5 mWaitingForNegativeProximity
这个变量的含义:
–True if the device should wait for negative proximity sensor before waking up the screen。While true, the screen remains off.
–This is set to false as soon as a negative proximity sensor measurement is observed or when the device is forced to go to sleep by the user
在打log观察中尝试了pSensor的靠近和远离,发现这个值只有在一种情况中出现过true(第三章情景10,持续到通话结束的情景)。
2.6 mProximitySensorEnabled
这个变量标志了pSensor监听器的注册状态,true-已注册,false-未注册。
2.7 pSensor工作逻辑详解
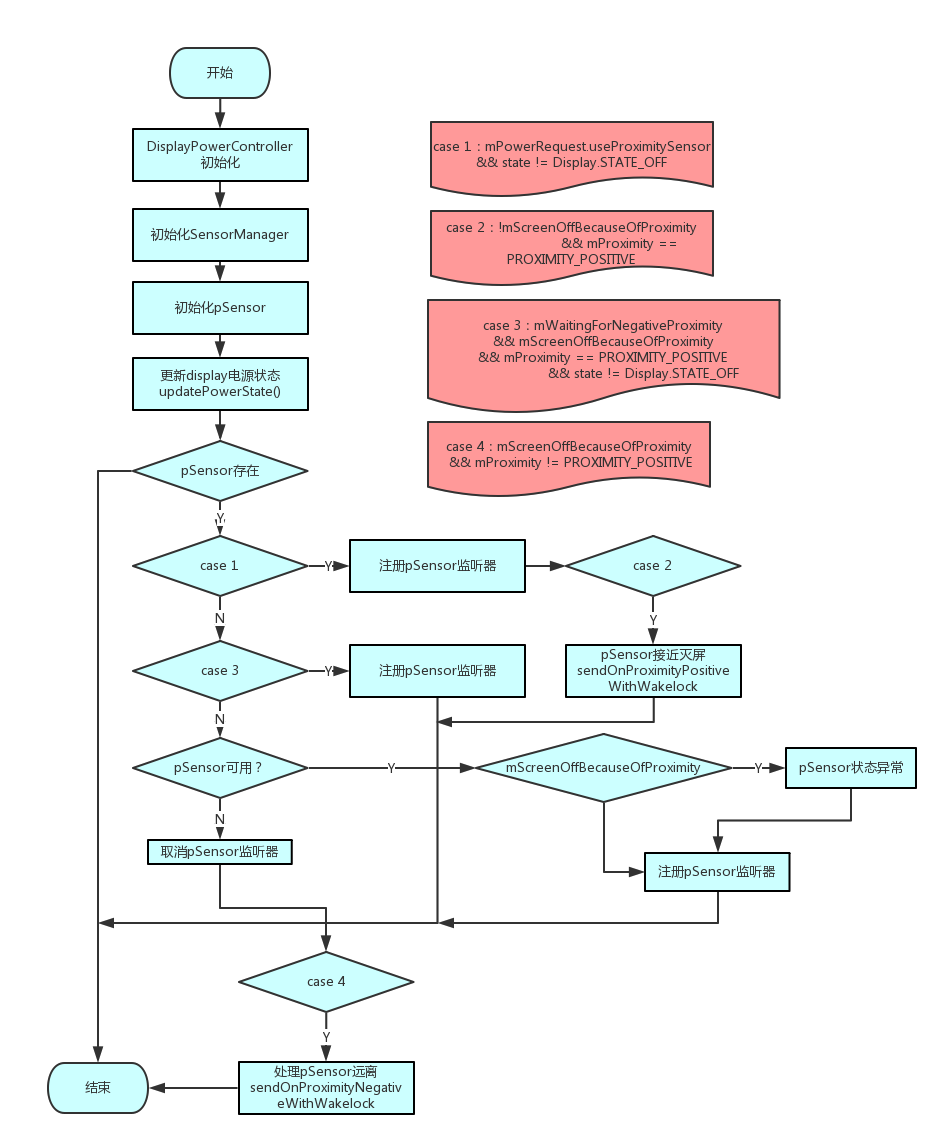
- 在DisplayPowerController的构造方法中初始化SensorManager和pSensor
- 调用updatePowerState方法更新电源状态
- 判断pSensor是否存在,yes的话走步骤4,否则结束
- Case1:判断pSensor是否在使用中且处于非灭屏状态,yes则执行步骤5,否则执行步骤8
- 注册pSensor状态监听器
- Case 2:pSensor为POSITIVE状态且当前没有因为pSensor而灭屏的状态,yes则执行步骤7
- 处理pSensor接近的事件,灭屏操作。
- Case 3:pSensor等待亮屏,且之前是由于pSensor而灭屏,且pSensor的状态为POSITIVE,且屏幕为非OFF。如果yes则执行步骤9,否则执行步骤10
- 注册pSensor状态监听器
- 判断pSensor是否正在使用,如果yes则执行步骤11,否则执行步骤14
- 判断是否有因为pSensor导致灭屏的状态,如果yes,结合case 1和步骤10可以得出走到步骤11时display的状态是OFF,而因为pSensor导致的灭屏display的状态还是保持ON的,所以此处出现了矛盾,说明pSensor的状态出现了异常,执行步骤12。否则执行步骤13
- 将pSensor的状态置为PROXIMITY_UNKNOWN
- 注册pSensor状态监听器
- 取消pSensor状态监听器
- Case 4:有因为pSensor而导致的灭屏状态,且pSensor的状态为非POSITIVE,如果yes则执行步骤16
- 处理pSensor远离事件
3. 常见情境下pSensor的代码走向
第二章中分析解析了pSensor相关的各种状态,以及不同状态下pSensor代码的流程逻辑。本章中将讲解不同情境下pSensor的实际工作流程,以便于理解和印证上一章中的代码逻辑。结合第一章中代码截图添加的log来定位代码走向。
情境一:idle状态时–亮屏情况下
可以看到更新电源状态时输出的log

解析:idle状态亮屏情况,pSensor不工作,屏幕状态为on,没有因为pSensor而导致的灭屏,pSensor状态PROXIMITY_UNKNOWN,代码走入了position 005,调用setProximitySensorEnabled(false)去取消pSensor的监听器。
情境二:idle状态时–灭屏情况下

解析:和亮屏状态流程一致,只是display的状态由on变成了off。
情境三:通话状态亮屏时pSensor未靠近

解析:pSensor可用,屏幕为on,没有因为pSensor而导致的灭屏,pSensor的状态为PROXIMITY_NEGATIVE,代码进入了position 001,注册pSensor监听器mProximitySensorListener。
情境四:通话状态下亮屏时pSensor靠近

解析:pSensor可用,屏幕为on,没有因为pSensor而导致的灭屏,pSensor的状态为PROXIMITY_POSITIVE,代码进入了position 001进行注册监听器。mProximitySensorEnabled=true所以不会再注册一次。然后代码走入position 002位置,调用sendOnProximityPositiveWithWakelock()方法,然后post一个runnable-mOnProximityPositiveRunnable这里通过接口调用了PMS的onProximityPositive方法来处理pSensor靠近的事件。
情境五:通话状态时因为pSensor靠近而灭屏之后pSensor再远离

解析:pSensor可用,屏幕为on,由于pSensor而导致了灭屏,pSensor状态为PROXIMITY_NEGATIVE,代码流程走入了position 001,注册pSensor监听器。然后走入position 006,调用sendOnProximityNegativeWithWakelock方法,post一个mOnProximityNegativeRunnable,通过接口调用到PMS的onProximityNegative来处理pSensor远离的事件。
情境六:通话过程中手动灭屏后pSensor远离

解析:pSensor可用,屏幕为off,没有因为pSensor导致的灭屏,pSensor状态为PROXIMITY_NEGATIVE,代码走入了position 007,只是注册监听器。
情境七:通话过程中手动灭屏后pSensor靠近

解析:和情境六的区别就在于pSensor的状态为POSITIVE。
情境八:通话过程中手动灭屏后pSensor靠近,然后再手动按power键

解析:和情景四相同。
情境九:情景8的基础上pSenor再远离

解析:和情景五相同。
情境十:话过程中pSensor靠近导致灭屏,一直持续到通话自动结束

解析:通话结束,pSensor失效,屏幕为on,目前是因为pSensor灭屏,pSensor状态为PROXIMITY_POSITIVE,等待屏幕点亮,代码走到position 003,注册监听器。
4. 周边相关代码解析
上文中讲解了pSensor工作流程的主要代码逻辑,还有几个相关的方法在本章在解析,包括了setProximitySensorEnabled(设置pSensor状态监听器)、SensorEventListener(pSensor事件监听器)、handleProximitySensorEvent(处理pSensor事件)、debounceProximitySensor(校准pSensor)、PMS中对pSensor事件的处理、PMS->updateWakefulnessLocked(PMS唤醒系统)。
4.1 setProximitySensorEnabled(boolean enable)
在pSensor处理流程中,只要状态mPowerRequest.useProximitySensor为true,表明正在使用pSensor,就会去注册pSensor状态监听器,此时就会调用setProximitySensorEnabled(true)(可以参照情境三),当pSensor不使用时就调用setProximitySensorEnabled(false)来取消监听器的注册(参照情境一)。
    private void setProximitySensorEnabled(boolean enable) {
        if (enable) {
            if (!mProximitySensorEnabled) {// 监听器未注册
                if (DEBUG) {
                    Slog.d(TAG, "setProximitySensorEnabled : True");
                }
                // Register the listener.
                // Proximity sensor state already cleared initially.
                mProximitySensorEnabled = true;// 设置标志位已注册
                mSensorManager.registerListener(mProximitySensorListener, mProximitySensor,
                        SensorManager.SENSOR_DELAY_NORMAL, mHandler);// 注册监听器
            }
        } else {
            if (mProximitySensorEnabled) {// pSensor监听器已注册
                if (DEBUG) {
                    Slog.d(TAG, "setProximitySensorEnabled : False");
                }
                // Unregister the listener.
                // Clear the proximity sensor state for next time.
                mProximitySensorEnabled = false;// 设置标志位为未注册
                mProximity = PROXIMITY_UNKNOWN;// 设置pSensor状态为PROXIMITY_UNKNOWN
                mPendingProximity = PROXIMITY_UNKNOWN;// 消抖的pSensor状态,mPendingProximity状态后续会讲到
                mHandler.removeMessages(MSG_PROXIMITY_SENSOR_DEBOUNCED);// 取消pSensor消抖的消息
                mSensorManager.unregisterListener(mProximitySensorListener);// unregister监听器
                clearPendingProximityDebounceTime(); // release wake lock (must be last)// 释放电源锁
            }
        }
    }
解析:代码逻辑可以参考注释,这里有一个变量mPendingProximity在后续中会继续讲到。
4.2 SensorEventListene
在4.1中注册监听器时用到了pSensor监听器的对象,所以在这里来看一下这个对象。
    private final SensorEventListener mProximitySensorListener = new SensorEventListener() {
        @Override
        public void onSensorChanged(SensorEvent event) {
            if (mProximitySensorEnabled) {// pSensor监听器已注册
                final long time = SystemClock.uptimeMillis();
                final float distance = event.values[0];// 获取上报的距离
                // 检测距离,如果在0和阈值之间则为positive,阈值获取方法为
                // mProximityThreshold = Math.min(mProximitySensor.getMaximumRange(), TYPICAL_PROXIMITY_THRESHOLD);
                // TYPICAL_PROXIMITY_THRESHOLD=5.0f
                //最后计算得出mProximityThreshold=1.0f
                boolean positive = distance >= 0.0f && distance < mProximityThreshold;
                handleProximitySensorEvent(time, positive);
            }
        }

        @Override
        public void onAccuracyChanged(Sensor sensor, int accuracy) {
            // Not used.
        }
    };
解析:在监听器中检测底层上报上来的SensorEvent事件,从中读取到最关键的pSensor状态值存入distance中。从驱动那儿了解到底层上报的pSensor状态只有0和1。0表示near的状态,1表示far的状态。在这段代码里我们用这个distance值来计算出positive是否为true。当distance为0时则positive则为true,distance为1时则为false,然后将当前时间和positive值传给handleProximitySensorEvent来处理pSensor事件。这里为什么要传入事件,在后面介绍。
4.3 handleProximitySensorEvent(long time, boolean positive)
    private void handleProximitySensorEvent(long time, boolean positive) {
        if (mProximitySensorEnabled) {
            if (mPendingProximity == PROXIMITY_NEGATIVE && !positive) {
                return; // no change
            }
            if (mPendingProximity == PROXIMITY_POSITIVE && positive) {
                return; // no change
            }// 以上两个判断,状态未改变,则不做处理

            // Only accept a proximity sensor reading if it remains
            // stable for the entire debounce delay.  We hold a wake lock while
            // debouncing the sensor.
            // 传感器防抖动处理
            mHandler.removeMessages(MSG_PROXIMITY_SENSOR_DEBOUNCED);
            if (positive) {
                mPendingProximity = PROXIMITY_POSITIVE;
                // 设置校准的时间,也就是在这段时间内数值稳定则读取pSensor数据,
                // PROXIMITY_SENSOR_POSITIVE_DEBOUNCE_DELAY的值越小pSensor越灵敏
                setPendingProximityDebounceTime(// PROXIMITY_SENSOR_POSITIVE_DEBOUNCE_DELAY的值默认为0
                        time + PROXIMITY_SENSOR_POSITIVE_DEBOUNCE_DELAY); // acquire wake lock
            } else {
                mPendingProximity = PROXIMITY_NEGATIVE;
                setPendingProximityDebounceTime(// PROXIMITY_SENSOR_POSITIVE_DEBOUNCE_DELAY的值默认为250
                        time + PROXIMITY_SENSOR_NEGATIVE_DEBOUNCE_DELAY); // acquire wake lock
            }

            // Debounce the new sensor reading.
            debounceProximitySensor();// 校准pSensor
        }
    }
解析:当传入的positive和当前状态一致时,return不做任何处理。然后是设置防抖动处理时间,这里就是传入当前时间的原因了。防抖动时间为当前时间加上一个预设的防抖动时间。这个时间越短则pSensor越灵敏,误触发的可能性也更大。对于POSITIVE和NEGATIVE的防抖动时间默认分别为0和250毫秒。
然后调用debounceProximitySensor来计算出新的pSensor状态。
4.4 debounceProximitySensor()
    private void debounceProximitySensor() {
        if (mProximitySensorEnabled// pSensor监听器已注册
                && mPendingProximity != PROXIMITY_UNKNOWN// pSensor有状态,不是未知
                && mPendingProximityDebounceTime >= 0) {// 校准时间大于等于0
            final long now = SystemClock.uptimeMillis();// 获取当前时间
            if (mPendingProximityDebounceTime <= now) {// 校准时间结束
                // Sensor reading accepted.  Apply the change then release the wake lock.
                mProximity = mPendingProximity;// 通过校准,获取pSensor状态,写入mProximity变量中
                updatePowerState();// 更新电源状态
                // 释放电源锁
                clearPendingProximityDebounceTime(); // release wake lock (must be last)
            } else {// 校准时间未结束,发送消息继续校准
                // Need to wait a little longer.
                // Debounce again later.  We continue holding a wake lock while waiting.
                Message msg = mHandler.obtainMessage(MSG_PROXIMITY_SENSOR_DEBOUNCED);
                msg.setAsynchronous(true);
                mHandler.sendMessageAtTime(msg, mPendingProximityDebounceTime);
            }
        }
    }
解析:首先判断监听器需要注册,且pSensor状态不是未知的,并且防抖动时间需要大于等于0。在取得当前时间,mPendingProximityDebounceTime即为上一节中的当前时间加上默认防抖动时间的值。如果这个值小于等于现在的当前时间,则说明防抖动过程结束,pSensor状态有效,将mPendingProximity写入mProximity中作为真正的pSensor状态供后续的流程使用。如果时间未到,则继续发message进行状态获取。接受到MSG_PROXIMITY_SENSOR_DEBOUNCED消息后继续调用debounceProximitySensor()方法。
    case MSG_PROXIMITY_SENSOR_DEBOUNCED:
        debounceProximitySensor();
        break;
4.5 PMS中对pSensor事件的处理
情境四和情境五分别描述了最典型的通话时pSensor靠近和原理的现象,其中屏幕的亮灭实际上是由PMS去控制的。这里来看一下具体代码实现。
    @Override
    public void onProximityPositive() {
        synchronized (mLock) {
            Slog.i(TAG, "onProximityPositive");
            mProximityPositive = true;
            mDirty |= DIRTY_PROXIMITY_POSITIVE;// 加入pSensor电源锁状态
            updatePowerStateLocked();// 更新电源状态,关键在其中的updateWakefulnessLocked方法
        }
    }

    @Override
    public void onProximityNegative() {
        synchronized (mLock) {
            Slog.i(TAG, "onProximityNegative");
            mProximityPositive = false;
            mDirty |= DIRTY_PROXIMITY_POSITIVE;
            userActivityNoUpdateLocked(SystemClock.uptimeMillis(),
                    PowerManager.USER_ACTIVITY_EVENT_OTHER, 0, Process.SYSTEM_UID);
            wakeUpNoUpdateLocked(SystemClock.uptimeMillis(),
                                 "android.server.power:POWER",
                                 Process.SYSTEM_UID,
                                 mContext.getOpPackageName(),
                                 Process.SYSTEM_UID);// 唤醒
            updatePowerStateLocked();
        }
    }
解析:PMS中的onProximityPositive方法来实际处理pSensor靠近,此时会在mDirty变量中或一个DIRTY_PROXIMITY_POSITIVE状态来表明pSensor的状态。然后调用updatePowerStateLocked方法来更新系统电源状态(此方法为PMS中更新电源状态入口,最核心方法)。然后调用到updateWakefulnessLocked方法。
    private boolean updateWakefulnessLocked(int dirty) {
        boolean changed = false;
        if ((dirty & (DIRTY_WAKE_LOCKS | DIRTY_USER_ACTIVITY | DIRTY_BOOT_COMPLETED
                | DIRTY_WAKEFULNESS | DIRTY_STAY_ON | DIRTY_PROXIMITY_POSITIVE// 如果有pSensor的positive的状态
                | DIRTY_DOCK_STATE)) != 0) {
            if (mWakefulness == WAKEFULNESS_AWAKE && isItBedTimeYetLocked()) {
                if (DEBUG_SPEW) {
                    Slog.d(TAG, "updateWakefulnessLocked: Bed time...");
                }
                final long time = SystemClock.uptimeMillis();
                if (shouldNapAtBedTimeLocked()) {
                    changed = napNoUpdateLocked(time, Process.SYSTEM_UID);
                } else {
                    changed = goToSleepNoUpdateLocked(time,// 系统休眠掉
                            PowerManager.GO_TO_SLEEP_REASON_TIMEOUT, 0, Process.SYSTEM_UID);
                }
            }
        }
        return changed;
    }
这里响应的判断传入的dirty值中包含了DIRTY_PROXIMITY_POSITIVE,则最后会走到goToSleepNoUpdateLocked方法来进行系统休眠,休眠就讲到这里,后续还可以参照电源管理之系统休眠流程。
onProximityNegative为PMS中处理pSensor远离的实际方法,这里比较简单,直接就能看到调用了wakeUpNoUpdateLocked方法来唤醒系统。