适用平台
Android Version: 6.0 Platform: MTK6580/MTK6735/MTK6753
1. 按键上报和分发机制
正常关机的流程是从Power键按下来启动的,所以在介绍关机流程之前首先介绍一下android系统的按键上报和分发机制,以便后续理解Power键的处理流程。按键处理设计的整体思路是驱动层会有一个消息队列来存放事件,会有一个Reader来不停的读取事件,一个Dispatcher来分发消息队列中的事件。Dispatcher分发的事件最后会通过jni上报到InputManagerService,然后通过接口最后传递给PhoneWindowManager,这里再根据不同的按键事件类型来做不同的处理。上层能做的修改基本上都是从PhoneWindowManager中开始的。
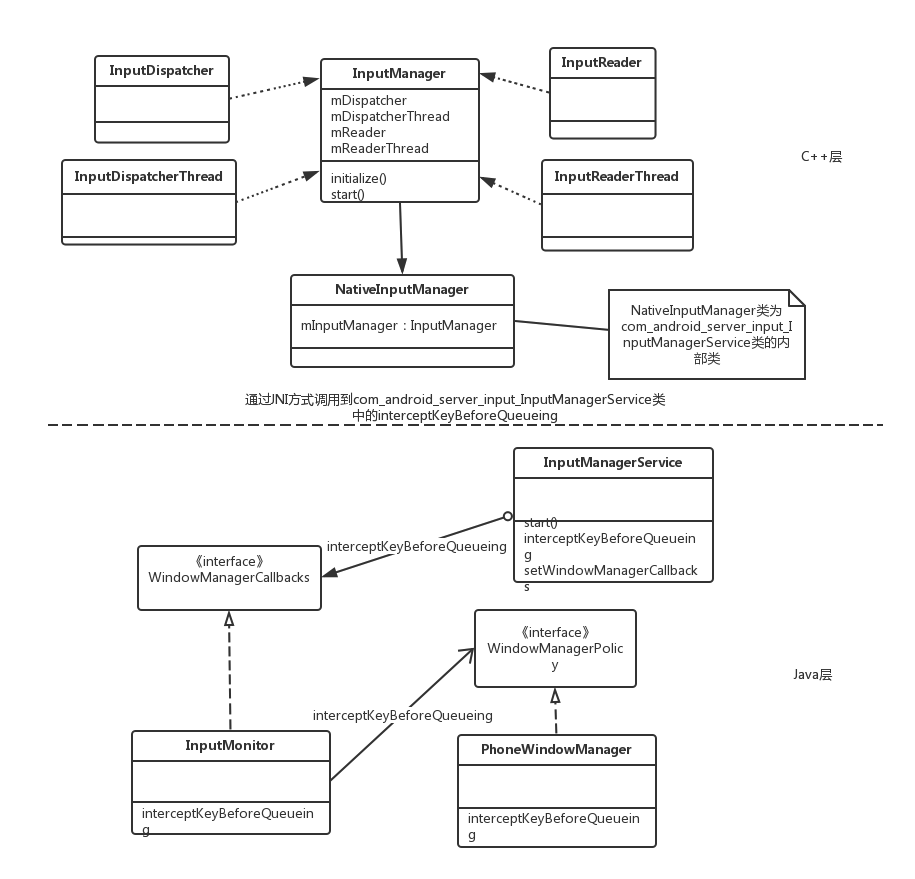
1.1 输入事件处理准备工作
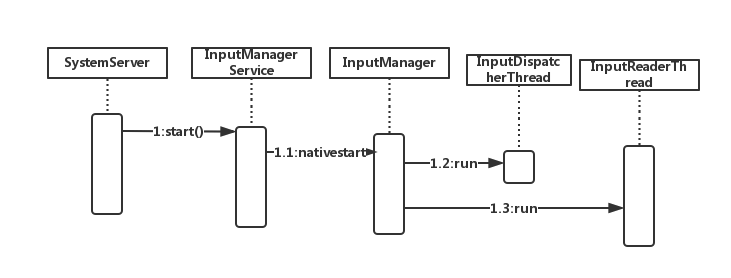
当系统开机之后SystemServer会启动InputManagerService,在SystemServer.java中的startOtherServices()方法中启动:
    Slog.i(TAG, "Input Manager");
    inputManager = new InputManagerService(context);

    Slog.i(TAG, "Window Manager");
    wm = WindowManagerService.main(context, inputManager,
            mFactoryTestMode != FactoryTest.FACTORY_TEST_LOW_LEVEL,
            !mFirstBoot, mOnlyCore);
    ServiceManager.addService(Context.WINDOW_SERVICE, wm);
    ServiceManager.addService(Context.INPUT_SERVICE, inputManager);

    mActivityManagerService.setWindowManager(wm);

    inputManager.setWindowManagerCallbacks(wm.getInputMonitor());
    inputManager.start();
看一下InputManagerService的构造方法:
    public InputManagerService(Context context) {
        this.mContext = context;
        this.mHandler = new InputManagerHandler(DisplayThread.get().getLooper());

        mUseDevInputEventForAudioJack =
                context.getResources().getBoolean(R.bool.config_useDevInputEventForAudioJack);
        Slog.i(TAG, "Initializing input manager, mUseDevInputEventForAudioJack="
                + mUseDevInputEventForAudioJack);
        mPtr = nativeInit(this, mContext, mHandler.getLooper().getQueue());

        LocalServices.addService(InputManagerInternal.class, new LocalService());
    }
主要是通过JNI的方式调用nativeInit方法传入一个消息队列作为参数,nativeInit对应是com_android_server_input_InputManagerService.cpp中的nativeInit。
    static jlong nativeInit(JNIEnv* env, jclass /* clazz */,
            jobject serviceObj, jobject contextObj, jobject messageQueueObj) {
        sp<MessageQueue> messageQueue = android_os_MessageQueue_getMessageQueue(env, messageQueueObj);
        if (messageQueue == NULL) {
            jniThrowRuntimeException(env, "MessageQueue is not initialized.");
            return 0;
        }

        NativeInputManager* im = new NativeInputManager(contextObj, serviceObj,
                messageQueue->getLooper());
        im->incStrong(0);
        return reinterpret_cast<jlong>(im);
    }
这里又new了一个NativeInputManager的对象,构造的参数主要还是这个消息队列的Looper。继续看一下NativeInputManager的构造函数,还是在com_android_server_input_InputManagerService.cpp中。
    NativeInputManager::NativeInputManager(jobject contextObj,
            jobject serviceObj, const sp<Looper>& looper) :
            mLooper(looper), mInteractive(true) {
        JNIEnv* env = jniEnv();

        mContextObj = env->NewGlobalRef(contextObj);
        mServiceObj = env->NewGlobalRef(serviceObj);

        {
            AutoMutex _l(mLock);
            mLocked.systemUiVisibility = ASYSTEM_UI_VISIBILITY_STATUS_BAR_VISIBLE;
            mLocked.pointerSpeed = 0;
            mLocked.pointerGesturesEnabled = true;
            mLocked.showTouches = false;
        }
        mInteractive = true;

        sp<EventHub> eventHub = new EventHub();
        mInputManager = new InputManager(eventHub, this, this);
    }
这里主要就是new出了InputManager的实例,最后再看一下构造函数和initialize方法,代码位于frameworks/native/services/inputflinger/InputManager.cpp中。
    InputManager::InputManager(
            const sp<EventHubInterface>& eventHub,
            const sp<InputReaderPolicyInterface>& readerPolicy,
            const sp<InputDispatcherPolicyInterface>& dispatcherPolicy) {
        mDispatcher = new InputDispatcher(dispatcherPolicy);
        mReader = new InputReader(eventHub, readerPolicy, mDispatcher);
        initialize();
    }

    InputManager::InputManager(
            const sp<InputReaderInterface>& reader,
            const sp<InputDispatcherInterface>& dispatcher) :
            mReader(reader),
            mDispatcher(dispatcher) {
        initialize();
    }

    InputManager::~InputManager() {
        stop();
    }

    void InputManager::initialize() {
        mReaderThread = new InputReaderThread(mReader);
        mDispatcherThread = new InputDispatcherThread(mDispatcher);
    }
在initialize中初始化了mReader和mDispatcher,以及两个相关的Thread。至此所需的关键对象都已经创建准备好,但是线程并未run起来。
1.2 启动事件读取和分发线程
在SystemServer中启动InputManagerService之后,调用了start方法:
    inputManager.setWindowManagerCallbacks(wm.getInputMonitor());
    inputManager.start();
在InputManagerService中的start方法中又调用了nativeStart方法,这个方法也是本地方法,具体实现在com_android_server_input_InputManagerService.cpp中。
    static void nativeStart(JNIEnv* env, jclass /* clazz */, jlong ptr) {
        NativeInputManager* im = reinterpret_cast<NativeInputManager*>(ptr);

        status_t result = im->getInputManager()->start();
        if (result) {
            jniThrowRuntimeException(env, "Input manager could not be started.");
        }
    }
接下来又调用了InputManager.cpp的start方法:
    status_t InputManager::start() {
        status_t result = mDispatcherThread->run("InputDispatcher", PRIORITY_URGENT_DISPLAY);
        if (result) {
            ALOGE("Could not start InputDispatcher thread due to error %d.", result);
            return result;
        }

        result = mReaderThread->run("InputReader", PRIORITY_URGENT_DISPLAY);
        if (result) {
            ALOGE("Could not start InputReader thread due to error %d.", result);

            mDispatcherThread->requestExit();
            return result;
        }

        return OK;
    }
在这里将DispatcherThread和ReaderThread运行起来。
 至此所有准备工作都已做完,等待按键事件的到来。
1.3 事件获取和分发
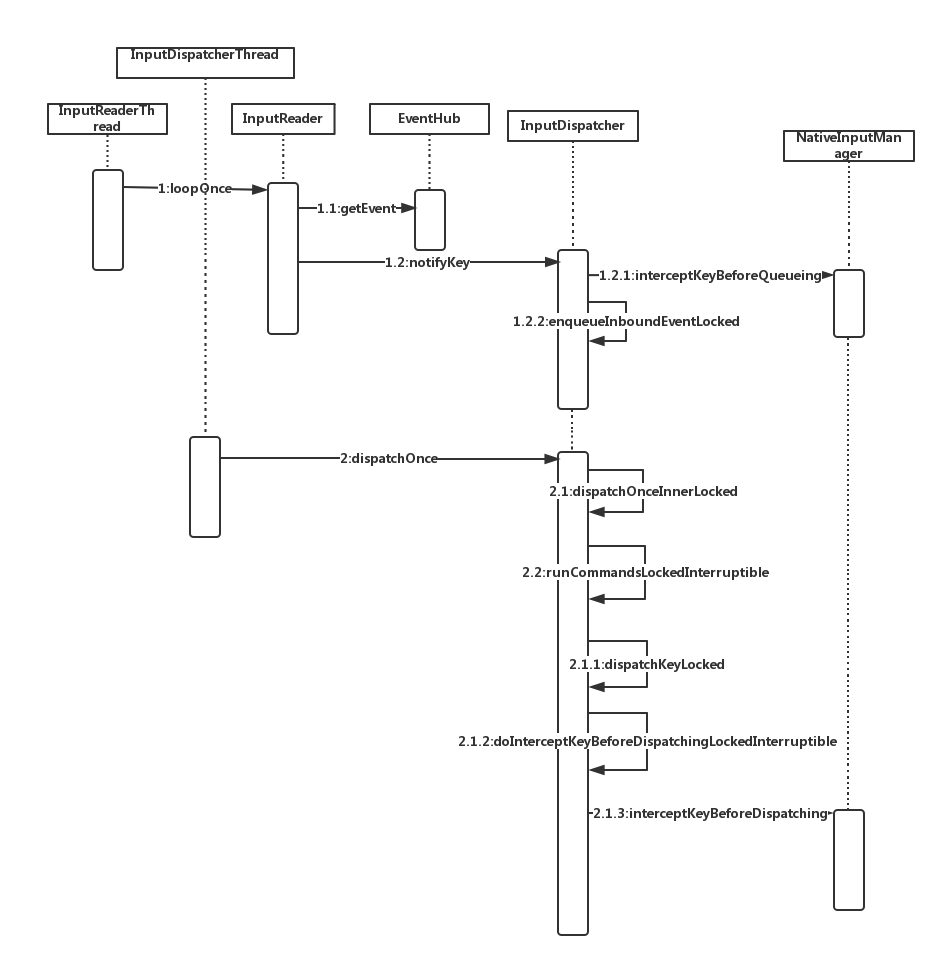
首先由InputReaderThread等待按键消息到来,该thread在threadLoop中无尽的调用InputReader的loopOnce方法,代码位于frameworks/native/services/inputflinger/InputReader.cpp:
    bool InputReaderThread::threadLoop() {
        mReader->loopOnce();
        return true;
    }
在loopOnce方法中会通过EventHub来获取事件放入buffer中:
size_t count = mEventHub->getEvents(timeoutMillis, mEventBuffer, EVENT_BUFFER_SIZE);
frameworks/native/services/inputflinger/EventHub.cpp中的getEvents方法一部分:
    size_t EventHub::getEvents(int timeoutMillis, RawEvent* buffer, size_t bufferSize) {
        ALOG_ASSERT(bufferSize >= 1);

        AutoMutex _l(mLock);

        struct input_event readBuffer[bufferSize];

        RawEvent* event = buffer;
InputReader从设备文件中读取的是RawEvent,在交给InputDispatcher进行分发之前,它需要先把RawEvent进行转化分类,拆分成KeyEvent、MotionEvent、TrackEvent各种类型等。如需了解拆分过程可以参照文章 Android输入事件流程中的EventHub分析及源码演示 来深入理解EventHub.cpp中的拆分过程。
在getEvents方法的最后来将队列中事件刷给监听器,监听器实际上就是InputDispatcher事件分发器。
    // Flush queued events out to the listener.
    // This must happen outside of the lock because the listener could potentially call
    // back into the InputReader's methods, such as getScanCodeState, or become blocked
    // on another thread similarly waiting to acquire the InputReader lock thereby
    // resulting in a deadlock.  This situation is actually quite plausible because the
    // listener is actually the input dispatcher, which calls into the window manager,
    // which occasionally calls into the input reader.
    mQueuedListener->flush();
然后会调用到frameworks/native/services/inputflinger/InputDispatcher.cpp的notifyKey方法。
    KeyEvent event;
    event.initialize(args->deviceId, args->source, args->action,
            flags, keyCode, args->scanCode, metaState, 0,
            args->downTime, args->eventTime);

    mPolicy->interceptKeyBeforeQueueing(&event, /*byref*/ policyFlags);
在notifyKey方法中通过InputDispatcherPolicyInterface接口来调用到NativeInputManager的interceptKeyBeforeQueueing方法通知是否需要在入队前对事件进行处理,然后接着调用InputDispatcher的enqueueInboundEventLocked方法将事件放入到队尾中。
    KeyEntry* newEntry = new KeyEntry(args->eventTime,
            args->deviceId, args->source, policyFlags,
            args->action, flags, keyCode, args->scanCode,
            metaState, repeatCount, args->downTime);

    needWake = enqueueInboundEventLocked(newEntry);
    bool InputDispatcher::enqueueInboundEventLocked(EventEntry* entry) {
        bool needWake = mInboundQueue.isEmpty();
        mInboundQueue.enqueueAtTail(entry);
        traceInboundQueueLengthLocked();

        switch (entry->type) {
以上流程是InputReader获取到设备事件通知分发器并存放到事件队列中。下面将介绍InputDispatcher如何从事件队列中读取事件并分发出去。首先在InputDispatcherThread的threadLoop中无尽的调用dispatchOnce方法,该方法两个功能:1、调用dispatchOnceInnerLocked分发事件;2、调用runCommandsLockedInterruptible来处理CommandQueue中的命令,出队并处理,直到队列为空。
下面具体介绍事件的分发,如果当前没有挂起的命令即CommandQueue为空,则调用dispatchOnceInnerLocked方法来分发事件,这里也是android系统出现事件响应ANR的地方,在之前挂起的事件命令过多时就会导致新的事件无法分发导致ANR,在dispatchOnceInnerLocked中成功分发后会去调用resetANRTimeoutsLocked()来重置ANR的时间。
    bool InputDispatcherThread::threadLoop() {
        mDispatcher->dispatchOnce();
        return true;
    }
    void InputDispatcher::dispatchOnce() {
        nsecs_t nextWakeupTime = LONG_LONG_MAX;
        { // acquire lock
            AutoMutex _l(mLock);
            mDispatcherIsAliveCondition.broadcast();

            // Run a dispatch loop if there are no pending commands.
            // The dispatch loop might enqueue commands to run afterwards.
            if (!haveCommandsLocked()) {
                dispatchOnceInnerLocked(&nextWakeupTime);
            }

            // Run all pending commands if there are any.
            // If any commands were run then force the next poll to wake up immediately.
            if (runCommandsLockedInterruptible()) {
                nextWakeupTime = LONG_LONG_MIN;
            }
        } // release lock

        // Wait for callback or timeout or wake.  (make sure we round up, not down)
        nsecs_t currentTime = now();
        int timeoutMillis = toMillisecondTimeoutDelay(currentTime, nextWakeupTime);
        mLooper->pollOnce(timeoutMillis);
    }
在dispatchOnceInnerLocked中会处理多种类型的事件,这里关注按键类型的(其他如触摸,设备重置等事件流程稍有区别)。如果Event类型为KEY,最后调用dispatchKeyLocked,再经过doInterceptKeyBeforeDispatchingLockedInterruptible这个方法之后就调用到了InputDispatcherPolicyInterface接口的interceptKeyBeforeDispatching方法。到这里就又很熟悉了,由NativeInputManager实现这个接口,然后又通过jni的方式调用到PhoneWindowManager的interceptKeyBeforeDispatching将按键事件分发传递给了java层。
    case EventEntry::TYPE_KEY: {// 如果事件为按键类型
        KeyEntry* typedEntry = static_cast<KeyEntry*>(mPendingEvent);
        if (isAppSwitchDue) {
            if (isAppSwitchKeyEventLocked(typedEntry)) {
                resetPendingAppSwitchLocked(true);
                isAppSwitchDue = false;
            } else if (dropReason == DROP_REASON_NOT_DROPPED) {
                dropReason = DROP_REASON_APP_SWITCH;
            }
        }
        if (dropReason == DROP_REASON_NOT_DROPPED
                && isStaleEventLocked(currentTime, typedEntry)) {
            dropReason = DROP_REASON_STALE;
        }
        if (dropReason == DROP_REASON_NOT_DROPPED && mNextUnblockedEvent) {
            dropReason = DROP_REASON_BLOCKED;
        }
        done = dispatchKeyLocked(currentTime, typedEntry, &dropReason, nextWakeupTime);
        break;
    }
事件的处理包括了两条主线:a、InputReader从EventHub中获取到按键事件,并通知InputDispatcher;InputDispatcher接到通知后调用interceptKeyBeforeQueueing方法进行相关的操作,并把按键事件加入到队列中,等待后面处理;b、InputDispatcher从消息队列中获取按键消息,调用interceptKeyBeforeDispatching方法判断是否对此消息进行拦截。
1.4 本章小结
这一部分介绍了事件上报和处理机制,首先是准备工作,SystemServer启动InputManagerService,然后依次创建了NativeInputManager、InputManager、InputReader、InputDispatcher这几个关键的对象以及InputReaderThread和InputDispatcherThread这两个关键线程。然后让这个两个thread启动起来,在InputReaderThread无限循环运行时,通过InputReader从EventHub中不断读取events然后通知InputDispatcher将事件入队。而InputDispatcherThread则通过InputDispatcher不停的将队列中的事件分发出去,这就是整个input系统的基本机制。
2. Power键处理流程
首先需要说明的是PhoneWindowManager中interceptKeyBeforeDispatching和interceptKeyBeforeQueueing的区别。interceptKeyBeforeQueueing方法是在消息入队之前进行拦截,这里一般处理一些实体按键的消息,处理的优先级最高,需要在第一时间响应。如果在入队前未被拦截,那么就会被放入到队尾,然后用事件分发器进行分发,在分发之前也可以调用interceptKeyBeforeDispatching来进行一次拦截。如果这里也没有拦截处理的话那么事件就被分发下去,将通过WindowManagerService按照窗口的层次一个个分发下去。分发的顺序是自上而下,然后自下而上进行处理,如果有一层完成处理返回true的话,那么这个事件处理就终结了。
 接下来看一下对Power键的响应。Power键需要在第一时间被响应,因此在PhoneWindowManager中的interceptKeyBeforeQueueing就对其进行处理。所以在我们自己的app里是无法捕获到Power键消息的。当键是按下状态时,调用interceptPowerKeyDown来处理,弹起状态则调用interceptPowerKeyUp。
    case KeyEvent.KEYCODE_POWER: {
        result &= ~ACTION_PASS_TO_USER;
        isWakeKey = false; // wake-up will be handled separately
        if (down) {
            interceptPowerKeyDown(event, interactive);
        } else {
            interceptPowerKeyUp(event, interactive, canceled);
        }
        break;
    }
先来看一下power键down时需要进行的处理。1、判断是否持有电源锁,如果未持有则acquire电源锁;2、取消多次按键的超时消息,这个是针对多次按电源键。当电源键在一定时间内被多次按下时可以设计触发特定效果(参照按音量键跳出VolumePanel的机制,此处可以做一定的创新思考)。3、检测有应用全屏的情况;4、判断是否该触发截屏(有类似截屏的需求可以从这块抄代码);5、静默来电功能,按下power键将静默来电铃声,如果设置了INCALL_POWER_BUTTON_BEHAVIOR_HANGUP,还可以实现直接power键挂断电话功能;6、如果power键一直未被处理,那么将检测短按、长按和组合按键事件;7、当interactive标志位为true时,也就意味着power键是可交互的,可以理解成就是亮屏状态下,那么如果存在长按(超过500ms)行为时则发送MSG_POWER_LONG_PRESS消息,在interceptPowerKeyDown中不会直接判断成短按事件,短按是在按键弹起,即interceptPowerUp中处理。反之,如果是不可交互的即处理灭屏状态,则唤醒屏幕。
    private void interceptPowerKeyDown(KeyEvent event, boolean interactive) {
        // Hold a wake lock until the power key is released.
        if (!mPowerKeyWakeLock.isHeld()) {
            mPowerKeyWakeLock.acquire();// 持锁
        }

        // Cancel multi-press detection timeout.
        if (mPowerKeyPressCounter != 0) {// 检测多次按键超时
            mHandler.removeMessages(MSG_POWER_DELAYED_PRESS);
        }

        // Detect user pressing the power button in panic when an application has
        // taken over the whole screen.
        // 检测全屏
        boolean panic = mImmersiveModeConfirmation.onPowerKeyDown(interactive,
                SystemClock.elapsedRealtime(), isImmersiveMode(mLastSystemUiFlags));
        if (panic) {
            mHandler.post(mHiddenNavPanic);
        }

        // Latch power key state to detect screenshot chord.
        // 截屏
        if (interactive && !mScreenshotChordPowerKeyTriggered
                && (event.getFlags() & KeyEvent.FLAG_FALLBACK) == 0) {
            mScreenshotChordPowerKeyTriggered = true;
            mScreenshotChordPowerKeyTime = event.getDownTime();
            interceptScreenshotChord();
        }

        // Stop ringing or end call if configured to do so when power is pressed.
        TelecomManager telecomManager = getTelecommService();
        boolean hungUp = false;
        if (telecomManager != null) {
            if (telecomManager.isRinging()) {
                // Pressing Power while there's a ringing incoming
                // call should silence the ringer.
                telecomManager.silenceRinger();// 响铃静音
                ///M: add for LG LV1 TD-563 by dengzhimin at 2016/11/25 @{
                if (((mIncallPowerBehavior & Settings.Secure.INCALL_POWER_BUTTON_BEHAVIOR_HANGUP) != 0) && interactive) {
                    if (canHungUpByPower) {
                        hungUp = telecomManager.endCall();// 挂断通话
                    }
                    canHungUpByPower = !hungUp;
                }
                Log.d("James", "[interceptPowerKeyDown] silenceRinger hungUp:" + hungUp);
                ///M: @}
            } else if ((mIncallPowerBehavior
                    & Settings.Secure.INCALL_POWER_BUTTON_BEHAVIOR_HANGUP) != 0
                    && telecomManager.isInCall() && interactive) {
                // Otherwise, if "Power button ends call" is enabled,
                // the Power button will hang up any current active call.
                hungUp = telecomManager.endCall();
            }
        }

        // If the power key has still not yet been handled, then detect short
        // press, long press, or multi press and decide what to do.
        ///M: add "canHungUpByPower" for LG LV1 TD-563 by dengzhimin at 2016/11/25
        mPowerKeyHandled = hungUp || canHungUpByPower || mScreenshotChordVolumeDownKeyTriggered
                || mScreenshotChordVolumeUpKeyTriggered;
        if (!mPowerKeyHandled) {// power键还未被处理
            if (interactive) {
                // When interactive, we're already awake.
                // Wait for a long press or for the button to be released to decide what to do.
                if (hasLongPressOnPowerBehavior()) {// 发送长按消息
                    Message msg = mHandler.obtainMessage(MSG_POWER_LONG_PRESS);
                    msg.setAsynchronous(true);
                    mHandler.sendMessageDelayed(msg,
                            ViewConfiguration.get(mContext).getDeviceGlobalActionKeyTimeout());
                }
            } else {
                wakeUpFromPowerKey(event.getDownTime());// 唤醒系统

                if (mSupportLongPressPowerWhenNonInteractive && hasLongPressOnPowerBehavior()) {
                    Message msg = mHandler.obtainMessage(MSG_POWER_LONG_PRESS);
                    msg.setAsynchronous(true);
                    mHandler.sendMessageDelayed(msg,
                            ViewConfiguration.get(mContext).getDeviceGlobalActionKeyTimeout());
                    mBeganFromNonInteractive = true;
                } else {
                    final int maxCount = getMaxMultiPressPowerCount();

                    if (maxCount <= 1) {
                        mPowerKeyHandled = true;
                    } else {
                        mBeganFromNonInteractive = true;
                    }
                }
            }
        }
    }
然后我们再来看一下在interceptPowerUp中处理了哪些事情。8、首先判断power键是否已经被处理或取消了,同时取消掉截屏等事件。如果power键还未被处理则首先判断是否要处理Multi-Press;9、如果没有其他动作,则直接开始处理按power键的事件,这里包括了多种情况:Double-Press,Triple-Press,系统休眠,返回home并休眠等类型。最后调用finishPowerKeyPress方法重置标志位,释放电源锁,完成power键的处理流程。
    private void interceptPowerKeyUp(KeyEvent event, boolean interactive, boolean canceled) {
        final boolean handled = canceled || mPowerKeyHandled;
        mScreenshotChordPowerKeyTriggered = false;
        cancelPendingScreenshotChordAction();
        cancelPendingPowerKeyAction();
        if (!handled) {// power键在down时未被处理掉
            // Figure out how to handle the key now that it has been released.
            mPowerKeyPressCounter += 1;

            final int maxCount = getMaxMultiPressPowerCount();
            final long eventTime = event.getDownTime();
            if (mPowerKeyPressCounter < maxCount) {
                // This could be a multi-press.  Wait a little bit longer to confirm.
                // Continue holding the wake lock.
                Message msg = mHandler.obtainMessage(MSG_POWER_DELAYED_PRESS,
                        interactive ? 1 : 0, mPowerKeyPressCounter, eventTime);
                msg.setAsynchronous(true);
                mHandler.sendMessageDelayed(msg, ViewConfiguration.getDoubleTapTimeout());
                return;
            }

            // No other actions.  Handle it immediately.
            // 直接响应处理,包括SinglePress和MultiPress
            powerPress(eventTime, interactive, mPowerKeyPressCounter);
        }

        // Done.  Reset our state.
        finishPowerKeyPress();
    }
而我们要深入研究的关机流程是从第6步发送长按事件开始的。
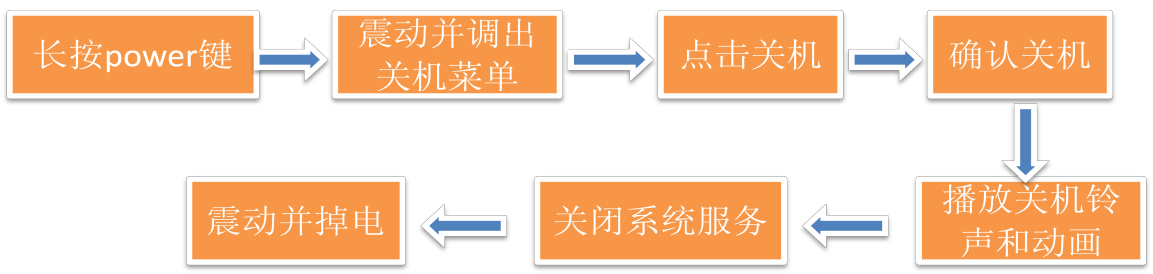
3. 关机流程
在PhoneWindowManager.java当捕获到长按 Power 键的事件时,发送 MSG_POWER_LONG_PRESS 消息给handler并在handleMessage方法中处理该消息,调用powerLongPress方法开始进入长按关机的流程。一个完整的关机包括了以下几个步骤。
3.1 关机菜单
那就先来看powerLongPress方法:
private void powerLongPress() {
        final int behavior = getResolvedLongPressOnPowerBehavior();// 获取消息类型
        switch (behavior) {
        case LONG_PRESS_POWER_NOTHING:
            break;
        case LONG_PRESS_POWER_GLOBAL_ACTIONS:
            mPowerKeyHandled = true;
            if (!performHapticFeedbackLw(null, HapticFeedbackConstants.LONG_PRESS, false)) {
                performAuditoryFeedbackForAccessibilityIfNeed();
            }
            showGlobalActionsInternal();// 显示关机菜单
            break;
        case LONG_PRESS_POWER_SHUT_OFF:
        case LONG_PRESS_POWER_SHUT_OFF_NO_CONFIRM:
            // 工模下直接关机
            mPowerKeyHandled = true;
            performHapticFeedbackLw(null, HapticFeedbackConstants.LONG_PRESS, false);
            sendCloseSystemWindows(SYSTEM_DIALOG_REASON_GLOBAL_ACTIONS);
            mWindowManagerFuncs.shutdown(behavior == LONG_PRESS_POWER_SHUT_OFF);
            break;
        }
    }
在handleMessage中处理MSG_POWER_LONG_PRESS消息会调用powerLongPress方法,在该方法中:1、首先会再进一步获取一次消息类型来确定处理方式。如果是在FactoryTest,则返回LONG_PRESS_POWER_SHUT_OFF_NO_CONFIRM,否则返回init初始的一个内部config值,这个值默认即为LONG_PRESS_POWER_GLOBAL_ACTIONS。这边如果有特殊需求将长按Power键处理成特殊类型,则可以模仿这种方式定义一个新的config值并添加处理的消息类型和方法来完成。2、震动并显示关机菜单;3、FactoryTest下震动并直接关机。
    private int getResolvedLongPressOnPowerBehavior() {
        if (FactoryTest.isLongPressOnPowerOffEnabled()) {
            return LONG_PRESS_POWER_SHUT_OFF_NO_CONFIRM;
        }
        return mLongPressOnPowerBehavior;
    }
    mLongPressOnPowerBehavior = mContext.getResources().getInteger(
            com.android.internal.R.integer.config_longPressOnPowerBehavior);
我们再进一步看看步骤2:
    void showGlobalActionsInternal() {
        sendCloseSystemWindows(SYSTEM_DIALOG_REASON_GLOBAL_ACTIONS);
        if (mGlobalActions == null) {
            mGlobalActions = new GlobalActions(mContext, mWindowManagerFuncs);
        }
        // 判断keyguard是否显示,值得借鉴
        final boolean keyguardShowing = isKeyguardShowingAndNotOccluded();
        mGlobalActions.showDialog(keyguardShowing, isDeviceProvisioned());
        if (keyguardShowing) {
            // since it took two seconds of long press to bring this up,
            // poke the wake lock so they have some time to see the dialog.
            mPowerManager.userActivity(SystemClock.uptimeMillis(), false);
        }
    }
这里主要就是new了一个GlobalActions(位于frameworks/base/services/core/java/com/android/server/policy/GlobalActions.java)的对象,这是一个继承了DialogInterface接口的类,用来显示关机菜单的对话框。在GlobalActions类中的createDialog方法里来添加这个对话框的各个菜单项,而每个菜单项又都是一个子类来定义的,我们以关机为例。
    if (GLOBAL_ACTION_KEY_POWER.equals(actionKey)) {
        mItems.add(new PowerAction());
    private final class PowerAction extends SinglePressAction implements LongPressAction {
        private PowerAction() {
            super(com.android.internal.R.drawable.ic_lock_power_off,
                R.string.global_action_power_off);// 定义菜单图标和文字
        }

        @Override
        public boolean onLongPress() {
            UserManager um = (UserManager) mContext.getSystemService(Context.USER_SERVICE);
            if (!um.hasUserRestriction(UserManager.DISALLOW_SAFE_BOOT)) {
                mWindowManagerFuncs.rebootSafeMode(true);// 长按进入安全模式
                return true;
            }
            return false;
        }

        @Override
        public boolean showDuringKeyguard() {
            return true;
        }

        @Override
        public boolean showBeforeProvisioning() {
            return true;
        }

        @Override
        public void onPress() {
            // shutdown by making sure radio and power are handled accordingly.
            ///M:[HQ_GLOBALACTION_RESTART] modify{@
            //default is false;
            mWindowManagerFuncs.shutdown(true /* confirm */);// 短按进入关机流程
			///@}
        }
    }
关机菜单项是由PowerAction这个子类的定义的,其中:1、构造方法里定义了菜单项的图标和显示字串;2、定义了长按响应,进入安全模式;3、定义了短按响应,进入关机流程,这里需要留意的是confirm参数,是决定是否要显示确认对话框的,不同客户的项目在这边的需求会不一样。
GlobalActions菜单中的菜单项设计都是遵循这种模式的,我们也做过很多添加其他菜单的需求,例如添加重启、飞行模式、情景模式开关、数据流量和wifi开关等,都可以模仿这种代码添加结构来实现。
3.2 关机流程
接下来继续跟着关机流程来看代码,shutdown方法是通过接口WindowManagerFuncs在WindowManagerService中实现的,然后又调用了ShutdownThread的shutdown方法,代码位于frameworks/base/services/core/java/com/android/server/power/ShutdownThread.java。
    public static void shutdown(final Context context, boolean confirm) {
        mReboot = false;
        mRebootSafeMode = false;
        Log.d(TAG, "!!! Request to shutdown !!!");
        if (mSpew) {
            StackTraceElement[] stack = new Throwable().getStackTrace();
            for (StackTraceElement element : stack)
            {
                Log.d(TAG, "    |----" + element.toString());
            }
        }
        if (SystemProperties.getBoolean("ro.monkey", false)) {
            // 屏蔽monkey测试时的误触发
            Log.d(TAG, "Cannot request to shutdown when Monkey is running, returning.");
            return;
        }
        shutdownInner(context, confirm);
    }
在shutdown方法里,1、判断是否处于monkey测试模式,如果是的话则屏蔽关机。所以在测试跑monkey是一定要先set这个ro.monkey值为true。所以在做monkey测试时,正常情况下是不会出现关机的,如果测试上报系统关机的问题,首先要排查的就是这个ro.monkey是否被set了,然后再去分析异常log。2、调用ShutdownThread的shutdownInner方法。
    if (confirm) {// 需要显示确认的对话框
        final CloseDialogReceiver closer = new CloseDialogReceiver(context);
        if (sConfirmDialog != null) {
            sConfirmDialog.dismiss();
        }
		///M:[HQ_GLOBALACTION_RESTART] modify{@
		if (!mRebootSafeMode && mReboot){// 重启或者是进入安全模式
			bConfirmForAnimation = confirm;
            sConfirmDialog = new AlertDialog.Builder(context)
                    .setTitle(com.android.internal.R.string.restart)
                    .setMessage(com.android.internal.R.string.reboot_confirm)
                    .setPositiveButton(com.android.internal.R.string.yes, new DialogInterface.OnClickListener() {
                        public void onClick(DialogInterface dialog, int which) {
                            beginShutdownSequence(context);
                            if (sConfirmDialog != null) {
                                sConfirmDialog = null;
                            }
                        }
                    })
                .setNegativeButton(com.android.internal.R.string.no, new DialogInterface.OnClickListener() {
                    public void onClick(DialogInterface dialog, int which) {
                        synchronized (sIsStartedGuard) {
                            sIsStarted = false;
                        }
                        if (sConfirmDialog != null) {
                            sConfirmDialog = null;
                            mReboot = false;//reset mReboot
                        }
                    }
                }).create();
			closer.dialog = sConfirmDialog;
	           sConfirmDialog.setOnDismissListener(closer);
	           sConfirmDialog.getWindow().setType(WindowManager.LayoutParams.TYPE_KEYGUARD_DIALOG);	           sConfirmDialog.show();
		} else {// 进入power off
		///@}
            bConfirmForAnimation = confirm;
            Log.d(TAG, "PowerOff dialog doesn't exist. Create it first");
            sConfirmDialog = new AlertDialog.Builder(context)
                .setTitle(mRebootSafeMode
                        ? com.android.internal.R.string.reboot_safemode_title
                        : com.android.internal.R.string.power_off)
                .setMessage(resourceId)
                .setPositiveButton(com.android.internal.R.string.yes,
                        new DialogInterface.OnClickListener() {
                    public void onClick(DialogInterface dialog, int which) {
                        beginShutdownSequence(context);
                    }
                })
                .setNegativeButton(com.android.internal.R.string.no, null)
                .create();
            closer.dialog = sConfirmDialog;
            sConfirmDialog.setOnDismissListener(closer);
            sConfirmDialog.getWindow().setType(WindowManager.LayoutParams.TYPE_KEYGUARD_DIALOG);
            sConfirmDialog.show();
		}
    } else {// 无须确认时直接开机shutdown流程
        beginShutdownSequence(context);
    }
}
在shutdownInner方法中比较核心的就是beginShutdownSequence方法,如果confirm为true,即关机需要确认,则在确认对话框点击ok时启动关机序列;如果无需确认,直接启动关机序列。继续来看beginShutdownSequence方法:
        // start the thread that initiates shutdown
        sInstance.mContext = context;
        sInstance.mPowerManager = (PowerManager)context.getSystemService(Context.POWER_SERVICE);
        sInstance.mHandler = new Handler() {
        };

        beginAnimationTime = 0;
        boolean mShutOffAnimation = configShutdownAnimation(context);
		mShutOffAnimation = true;
        int screenTurnOffTime = getScreenTurnOffTime(context);
        synchronized (mEnableAnimatingSync) {
            if (mEnableAnimating) {// 播放关机动画铃声
                if (mShutOffAnimation) {
                    Log.d(TAG, "mIBootAnim.isCustBootAnim() is true");
                    bootanimCust(context);
                } else {
                    pd.show();

                    sInstance.mProgressDialog = pd;
                }
                sInstance.mHandler.postDelayed(mDelayDim, screenTurnOffTime);
            }
        }

        // make sure we never fall asleep again
        // 保持不休眠
        sInstance.mCpuWakeLock = null;
        try {
            sInstance.mCpuWakeLock = sInstance.mPowerManager.newWakeLock(
                    PowerManager.PARTIAL_WAKE_LOCK, TAG + "-cpu");
            sInstance.mCpuWakeLock.setReferenceCounted(false);
            sInstance.mCpuWakeLock.acquire();
        } catch (SecurityException e) {
            Log.w(TAG, "No permission to acquire wake lock", e);
            sInstance.mCpuWakeLock = null;
        }

        // also make sure the screen stays on for better user experience
        // 保持屏幕亮着
        sInstance.mScreenWakeLock = null;
        if (sInstance.mPowerManager.isScreenOn()) {
            try {
                sInstance.mScreenWakeLock = sInstance.mPowerManager.newWakeLock(
                        PowerManager.FULL_WAKE_LOCK, TAG + "-screen");
                sInstance.mScreenWakeLock.setReferenceCounted(false);
                sInstance.mScreenWakeLock.acquire();
            } catch (SecurityException e) {
                Log.w(TAG, "No permission to acquire wake lock", e);
                sInstance.mScreenWakeLock = null;
            }
        }

        if (sInstance.getState() != Thread.State.NEW || sInstance.isAlive()) {// 关机进程已存在
            if (mShutdownFlow == IPO_SHUTDOWN_FLOW) {// MTK IPO关机流程
                Log.d(TAG, "ShutdownThread exists already");
                checkShutdownFlow();
                synchronized (mShutdownThreadSync) {
                    mShutdownThreadSync.notify();
                }
            } else {
                Log.e(TAG, "Thread state is not normal! froce to shutdown!");
                delayForPlayAnimation(); //为关机动画做延时
                //unmout data/cache partitions while performing shutdown
                sInstance.mPowerManager.goToSleep(SystemClock.uptimeMillis(),
                        PowerManager.GO_TO_SLEEP_REASON_SHUTDOWN, 0);
                PowerManagerService.lowLevelShutdown();// 关机操作
            }
        } else {
            sInstance.start();// 关机进程不存在,则start关机进程
        }
在beginShutdownSequence这个方法中主要做了三件事情:1、准备关机铃声和关机动画,这里会调用bootanimCust()来播放关机动画和声音,顺便提一下播放方式是通过设置SystemProperties的方式实现的。这里可以用adb来模拟实现调试关机铃声和动画,具体方法为:
adb shell setprop service.bootanim.exit 0//准备播放关机动画,不写这个值无法播放,只会屏幕dim
adb shell setprop ctl.start bootanim:shut mp3//播放关机动画和关机声音
adb shell setprop ctl.start bootanim:shut nomp3//播放关机动画没有声音
adb shell setprop service.bootanim.exit 1//结束关机动画
2、申请电源锁保持亮屏;3、运行thread来初始化关机。
在初始化关机时,1、判断thread是否已经存在;2、如果thread已经在运行,检查是否是IPO关机流程,在这个流程里会检查IPO关机的一些属性设置,然后随机选择一个在该对象上调用wait方法的线程,解除其阻塞状态。该方法只能在同步方法或同步块内部调用。如果当前线程不是锁的持有者,该方法抛出一个IllegalMonitorStateException。3、如果不是IPO关机流程,则说明thread已经异常了,则执行强制关机,系统进入休眠之后直接调用lowLevelShutdown通过设置系统属性值SystemProperties.set(“ctl.start”, “shutdown”)来直接关机。4、正常情况下,通过线程的run方法来执行关机流程。
在google原始代码中,关机流程是直接在run中执行的,而MTK加入了IPO关机流程,在run中判断IPO关机,将原先关机的代码写到了running方法中。
    public void run() {
        checkShutdownFlow();
        while (mShutdownFlow == IPO_SHUTDOWN_FLOW) {
            mShutdownManager.saveStates(mContext);
            mShutdownManager.enterShutdown(mContext);
            switchToLauncher();
            running();
        }
        if (mShutdownFlow != IPO_SHUTDOWN_FLOW) {
            mShutdownManager.enterShutdown(mContext);
            switchToLauncher();
            running();
        }
    }
在running方法中关机的核心过程如下:
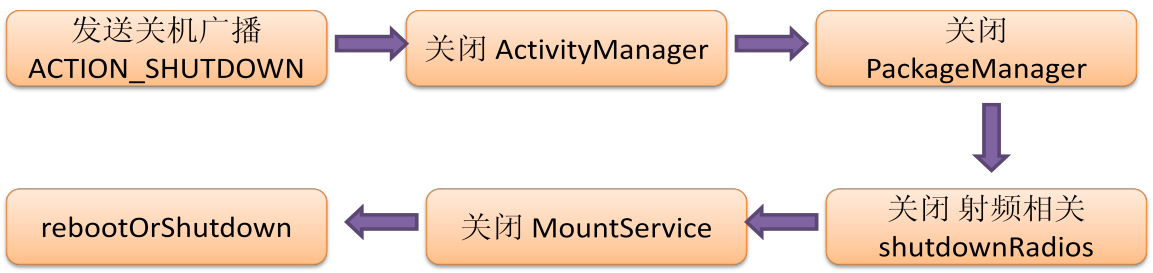 1、发送关机广播通知所有注册该广播的程序进行关机处理;2、关闭ActivityManager;3、关闭PackageManager;4、关闭射频相关,其中包括了NFC,Radio和Bluetooth;5、关闭MountService;调用rebootOrShutdown来最终处理重启或者是关机。
    public static void rebootOrShutdown(final Context context, boolean reboot, String reason) {
        if (reboot) {
            Log.i(TAG, "Rebooting, reason: " + reason);
            PowerManagerService.lowLevelReboot(reason);
            Log.e(TAG, "Reboot failed, will attempt shutdown instead");
        } else if (SHUTDOWN_VIBRATE_MS > 0 && context != null) {
            // vibrate before shutting down
            Vibrator vibrator = new SystemVibrator(context);
            try {
                vibrator.vibrate(SHUTDOWN_VIBRATE_MS, VIBRATION_ATTRIBUTES);
            } catch (Exception e) {
                // Failure to vibrate shouldn't interrupt shutdown.  Just log it.
                Log.w(TAG, "Failed to vibrate during shutdown.", e);
            }

            // vibrator is asynchronous so we need to wait to avoid shutting down too soon.
            try {
                Thread.sleep(SHUTDOWN_VIBRATE_MS);
            } catch (InterruptedException unused) {
            }
        }

        // Shutdown power
        Log.i(TAG, "Performing low-level shutdown...");
        PowerManagerService.lowLevelShutdown();
    }
如果是重启,则调用lowLevelReboot,否则执行震动,并调用lowLevelShutdown来关机。这里需要说明的是,不管是重启还是关机,最后都是使用SystemProperties写系统属性的方式来实现的。这里也可以用adb命令来效仿。例如烧版本异常无法关机,但是adb依旧可以连接的情况,可以用命令adb shell setprop sys.powerctl shutdown来执行关机掉电。
至此,所有关机动作都已完成。
3.3 本章小结
总结一下关机的整个流程:1、GlobalActions创建关机菜单,并添加关机选项PowerAction;2、点击关机,触发PowerAction的onPress方法,然后通过接口调用到WindowManagerService的shutdown方法,再调用ShutdownThread的shutdown方法真正进入关机代码流程;3、进一步调用shutdownInner,通过传入的confirm值,如果为true则弹出确认关机对话框,点击ok之后调用beginShutdownSequence进入关机序列,否则直接调用beginShutdownSequence。4、beginShutdownSequence方法中会准备和播放关机动画和铃声,然后执行thread的run方法来进行关机,MTK的代码则会多一步检测是否是IPO关机流程。5、在run方法中,发送关机广播通知,关闭ActivityManager、PackageManager、radios以及MountService,最后通过rebootOrShutdown方法调用掉PMS的lowLevelShutdown来使系统掉电。